You’ve probably heard of the most common nautical knots: the bowline, the round-turn and two half-hitches, the sheet bend – and you may even know how to tie them. But do you remember which knot to use in every situation?
Understanding boating knots and when to use them can help improve your safety on the water. So, whether you’re a new boater or simply in need of a quick refresher, these knots can prevent expensive damage to your craft and even save lives.
Today we’ll cover:
- The Dock Cleat
- Clove Hitch
- Bowline
- Sheet Bend
- Figure 8
- Alpine Butterfly
Keep reading, then practice each knot!
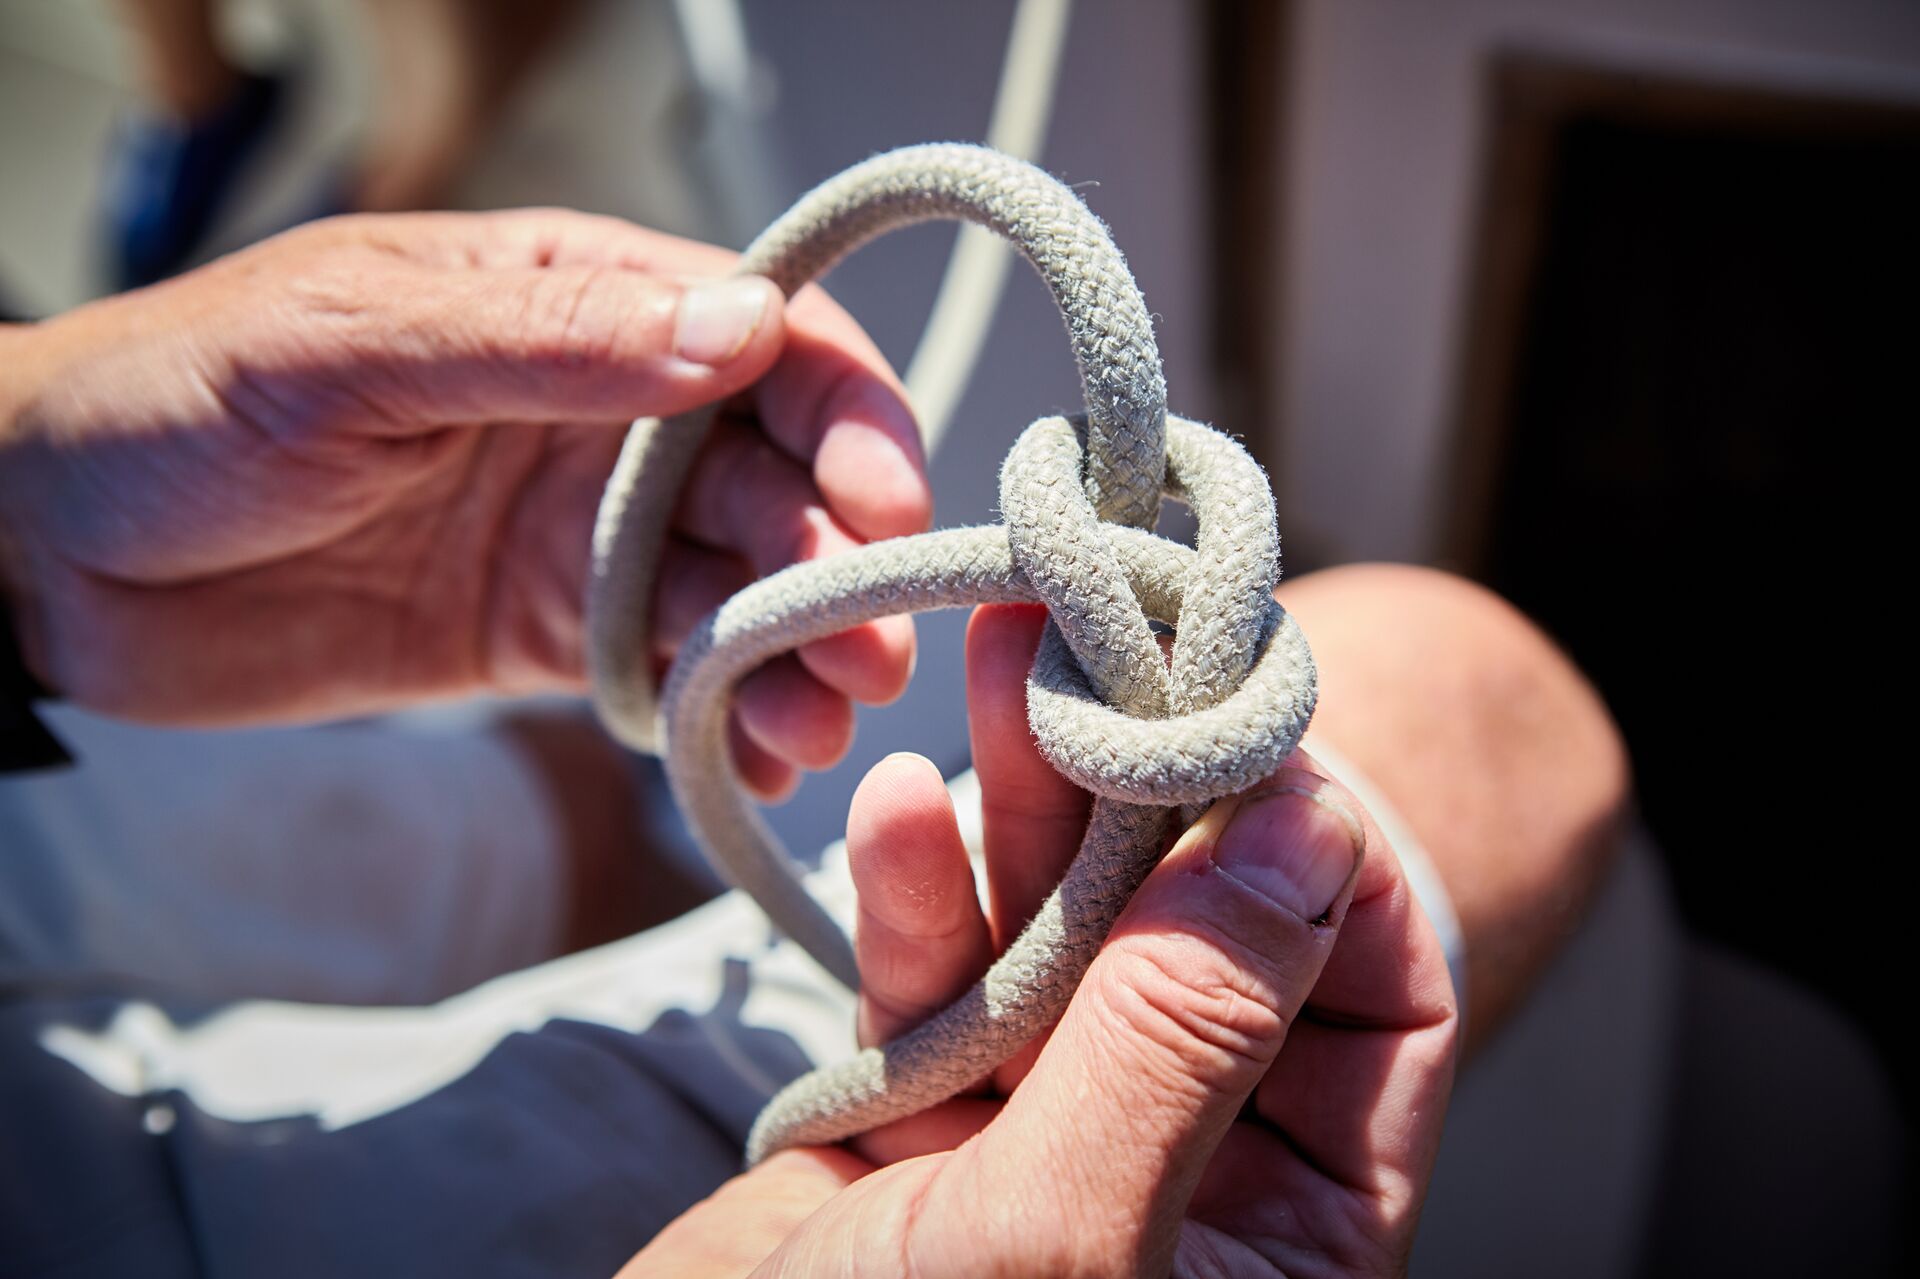
Knots Are Crucial for Mooring
Poor mooring can cause costly damage to your boat when the waves smash it against the dock.
For proper mooring, make sure to have at least four lines: a bow line and a stern line to prevent drift, and forward and aft spring lines to prevent the boat moving – you guessed it – forward and aft. Don’t forget to have a minimum of two fenders, which act as bumpers between the boat and the dock.
6 Nautical Knots Boaters Should Know
So, what are the most important knots boaters should know? Today we cover six nautical knots to practice and master before your next outing on the water.
1. The Dock Cleat Knot
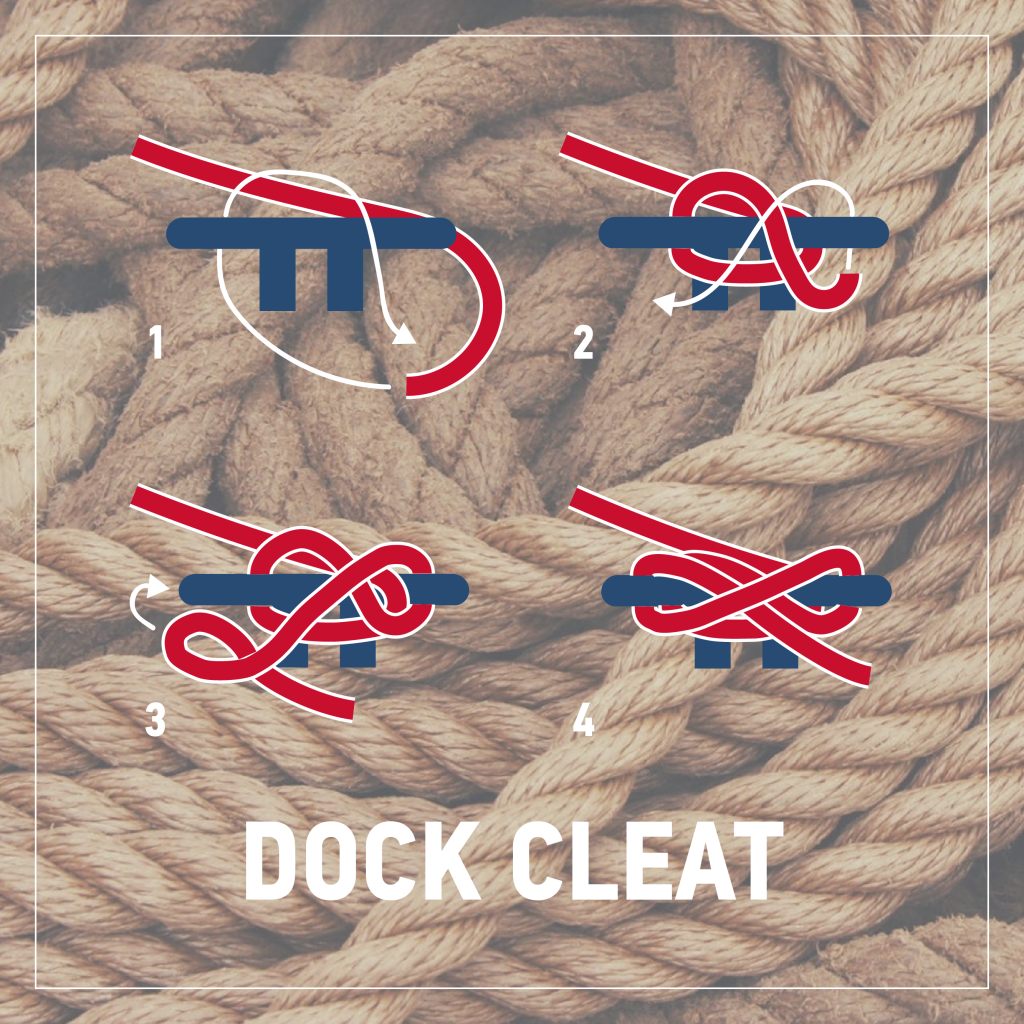
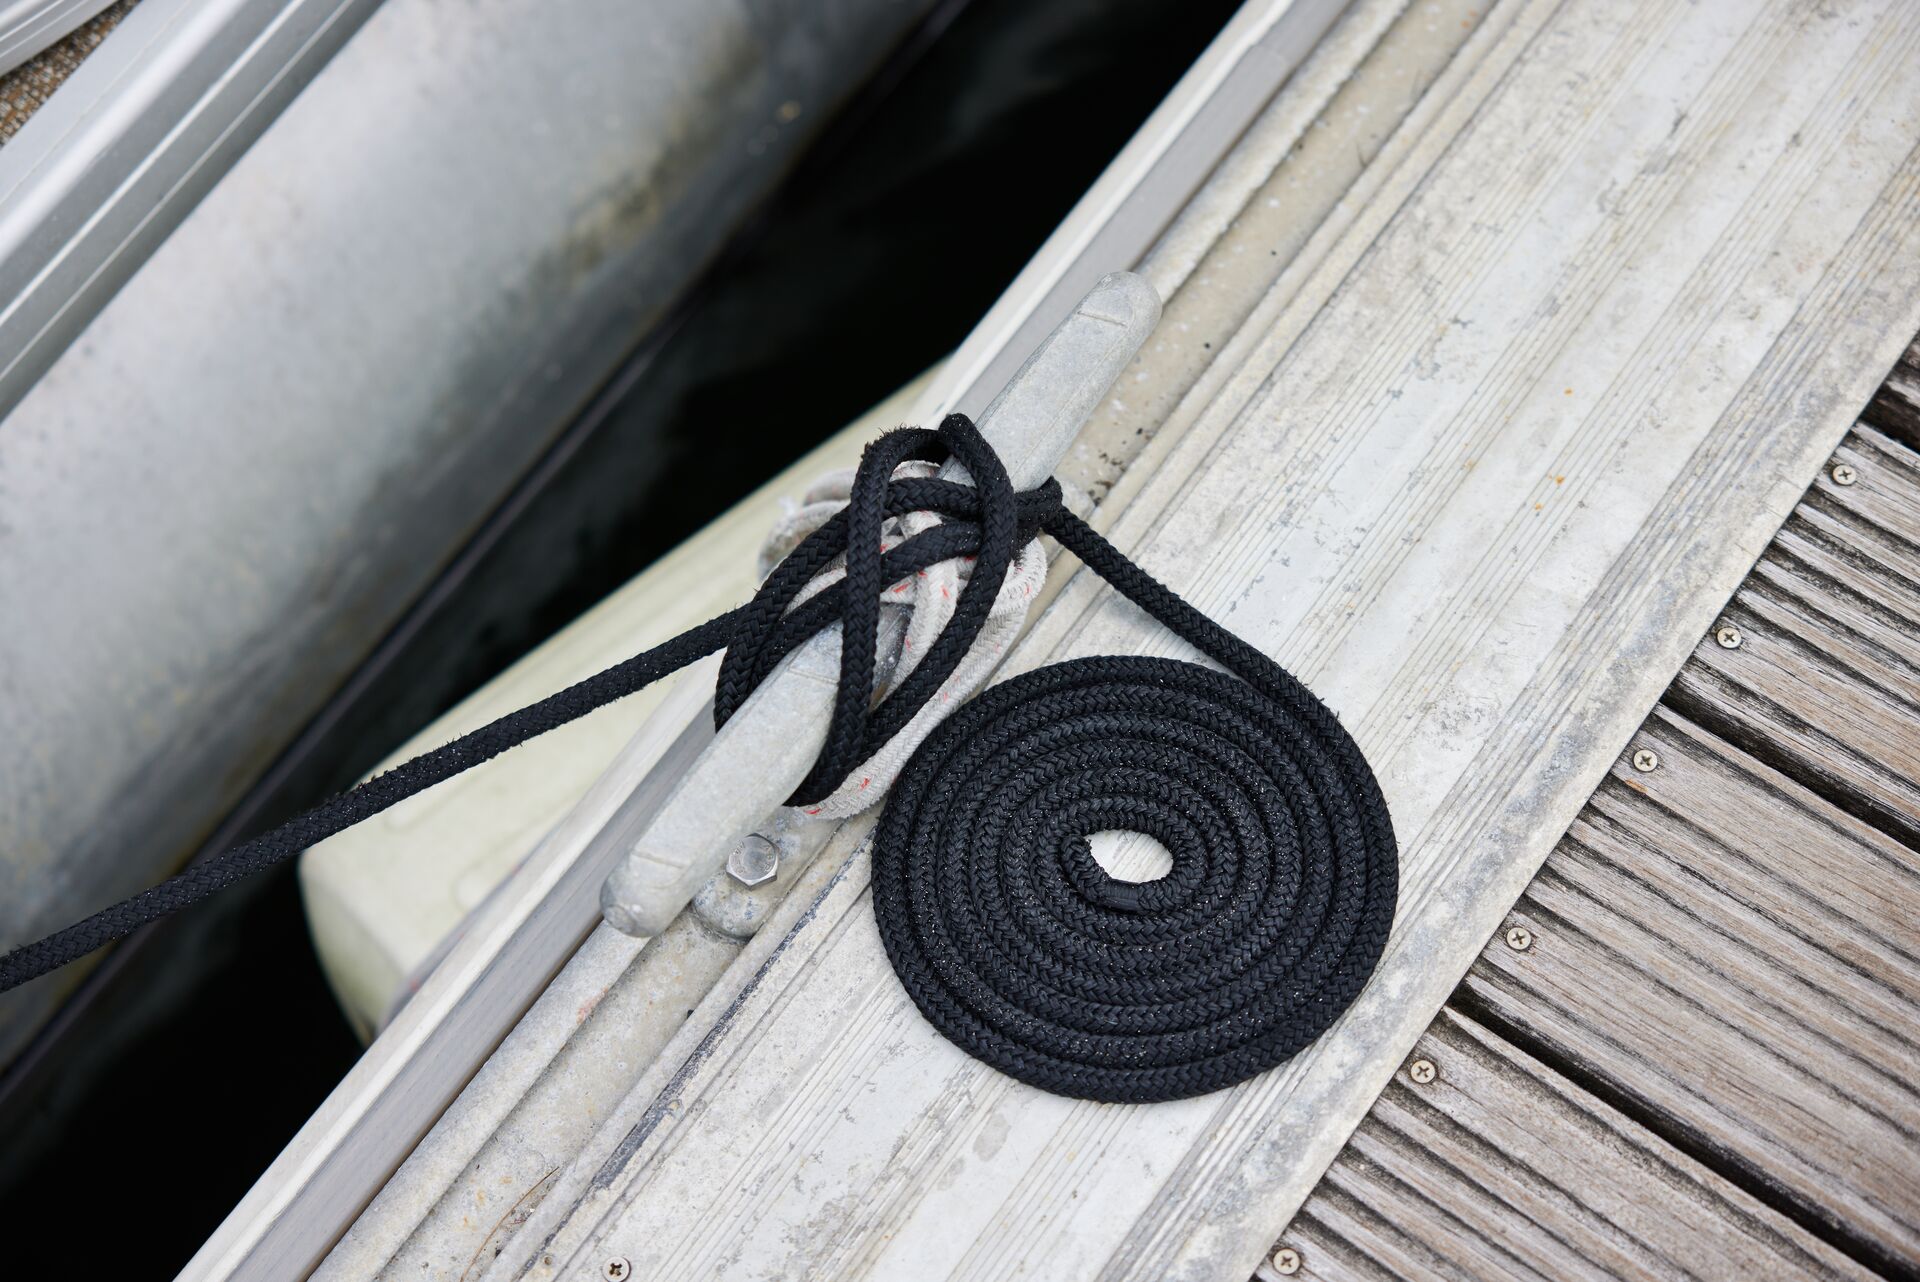
To securely moor a line to a cleat on a dock, the dock cleat knot is common and simple to learn. It’s also one of the most important knots you’ll need to keep your boat from floating away.
There are three steps to this knot:
-
Wrap the line around the cleat: Pass the line under one of the horns of the cleat. Then, wrap the line around the base of the cleat once in a clockwise direction. This creates a loop around the base.
-
Make a figure-eight: Bring the line over the top of the cleat and under the opposite horn to form a figure-eight pattern. Then, cross the line over the top of the cleat again. Wrap it under the first horn.
-
Form a half-hitch: To secure the knot, make a half-hitch by twisting the line and forming a loop. Place it over one of the cleat horns. Next, pull the loop tight so that the line grips firmly against the cleat.
If you need additional security, repeat the half-hitch on the other horn of the cleat. Make sure the line is snug and the knot is tight so it doesn’t slip.
2. The Clove Hitch Knot
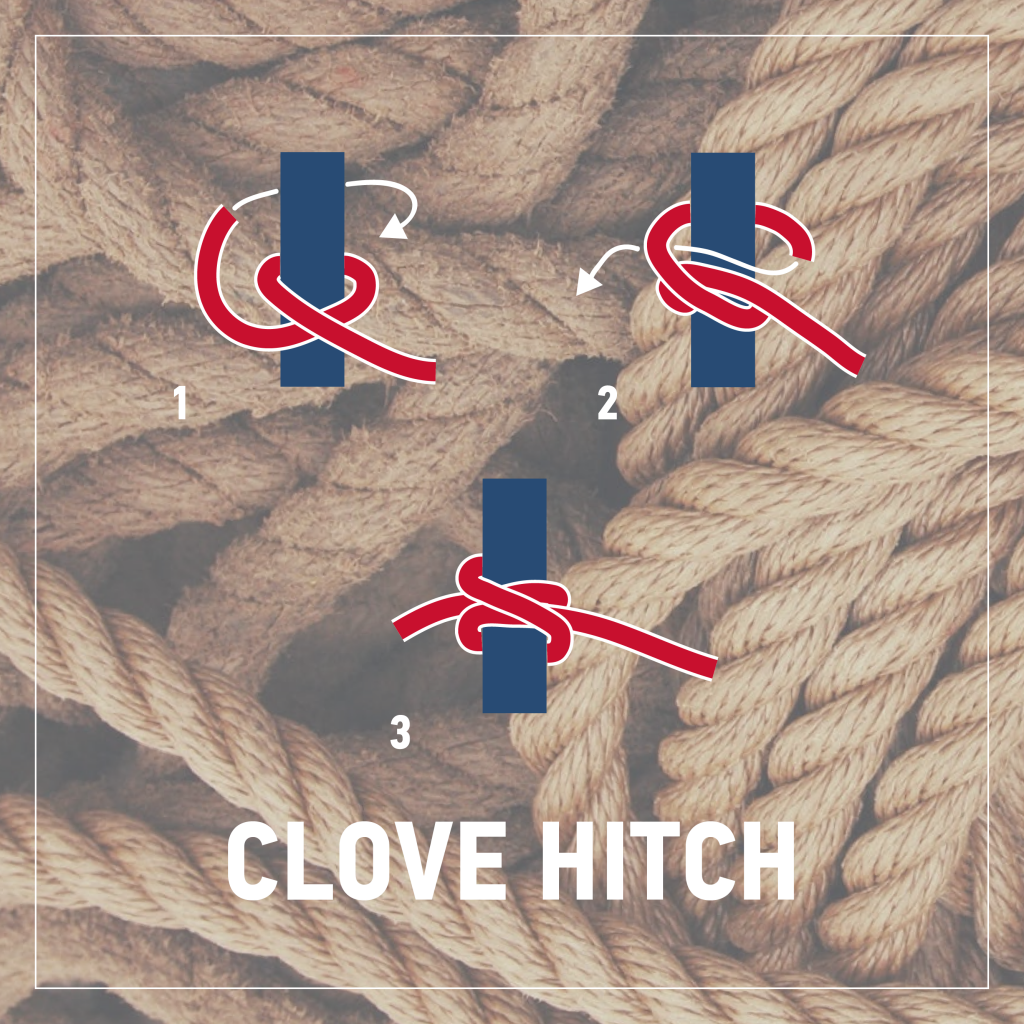
When you find yourself mooring to a dock with posts but no cleats, use a clove hitch. It’s easier than round-turn and two half-hitches, and it won’t come undone if the load heavy like a boat.
You can also use this knot for towing. If the towed boat has a bow eye that can be easily accessed from on deck, use it to attach the tow line. Make sure to use at least 50 feet of line, if not 100 feet, for the safest tow.
3. Bowline Knot
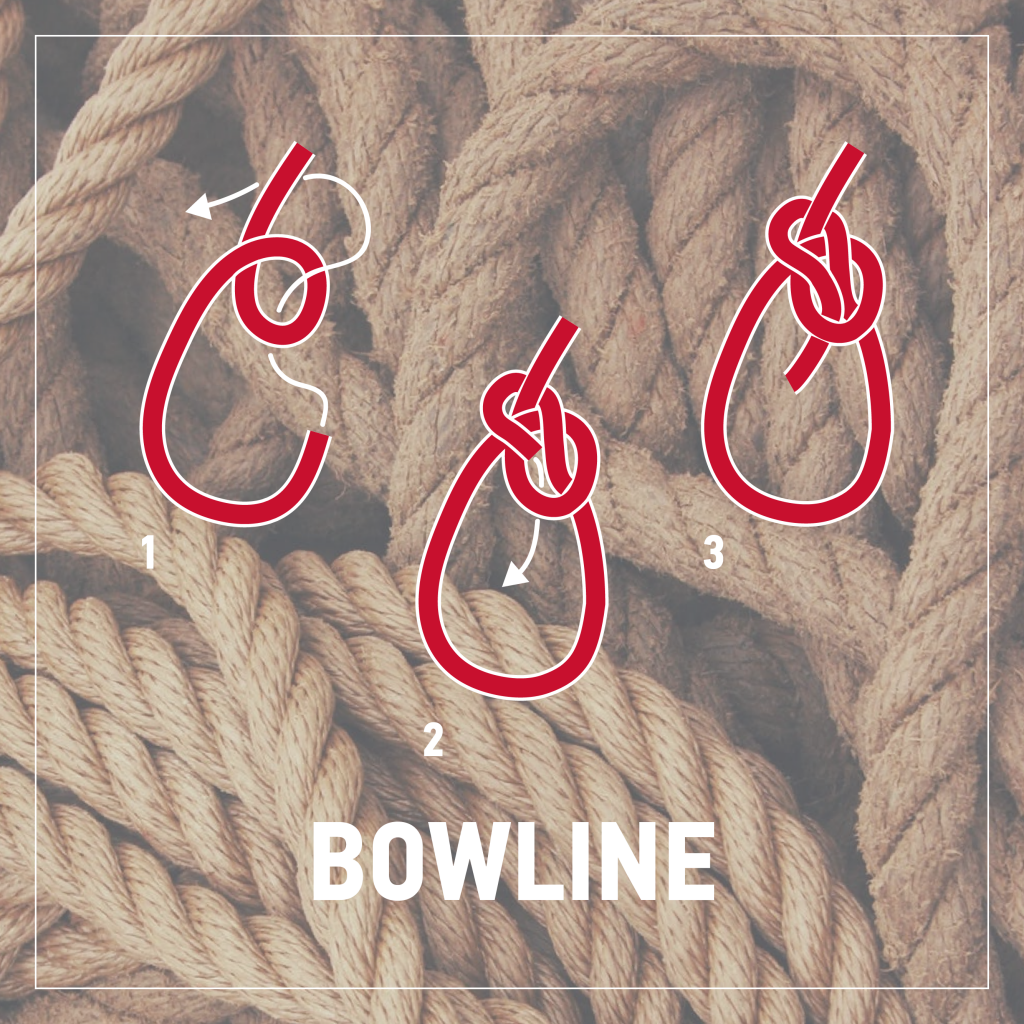
This classic, non-slip loop can be used for tying a painter to a small boat. Because this knot can’t slip, it can’t be released under tension, so keep a knife handy at all time during the tow in case of a problem.
To tie a bowline knot:
-
Make a small loop: Hold the rope and make a small overhand loop, leaving enough length on the working end to form the loop and finish the knot. The working end goes over the standing part of the rope.
-
Thread the working end: Take the working end of the rope and pass it up through the loop from underneath.
-
Wrap around the standing part: Wrap the working end around the standing part of the rope. The “standing” part is the long part that isn’t moving.
-
Thread the working end back through the loop: Pass the working end back down through the loop you first made, going over the top of the loop this time.
-
Tighten the Knot: Pull the working end tight while holding the standing part of the rope.
The knot should form a secure loop that won’t slip or come undone.
4. The Sheet Bend Knot
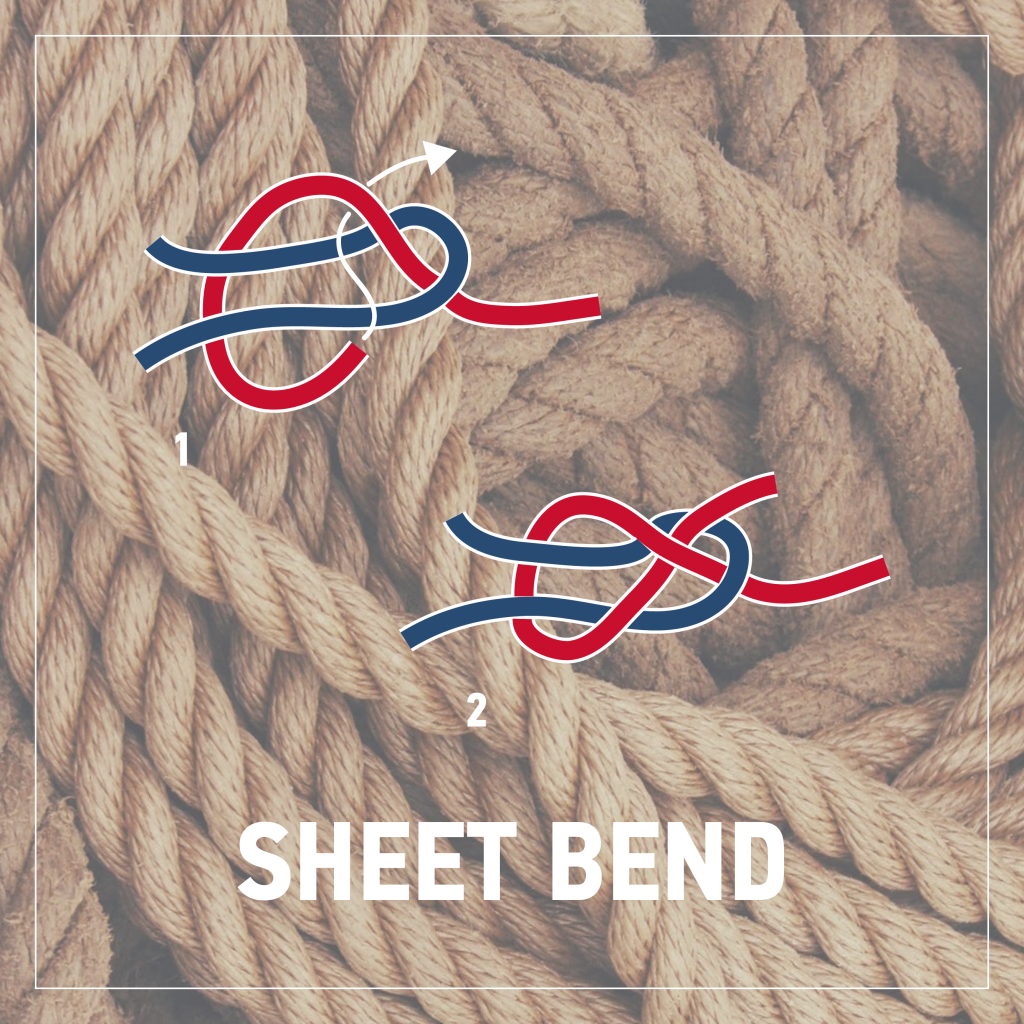
The sheet bend knot is the best option for securing two lines, especially lines of different sizes. If both boats already have lines attached, use it to tie together two lines during a tow.
This knot is ideal for tow sports. Remember to get a line specifically intended for the water sport of your choice, as each activity will require a line of different length, weave (stretch), material, moisture absorption, and breaking strength.
The safest lines for tow sports will have looped ends or carabiners so they won’t require actual knots. To tie a broken water sport rope in a pinch, use a sheet bend for towing.
A useful tip: when you’re done using the line, allow it to drag freely in the water while coiling it – that way, it won’t be stored full of tangles and twists that weaken the line.
5. Figure 8 Knot
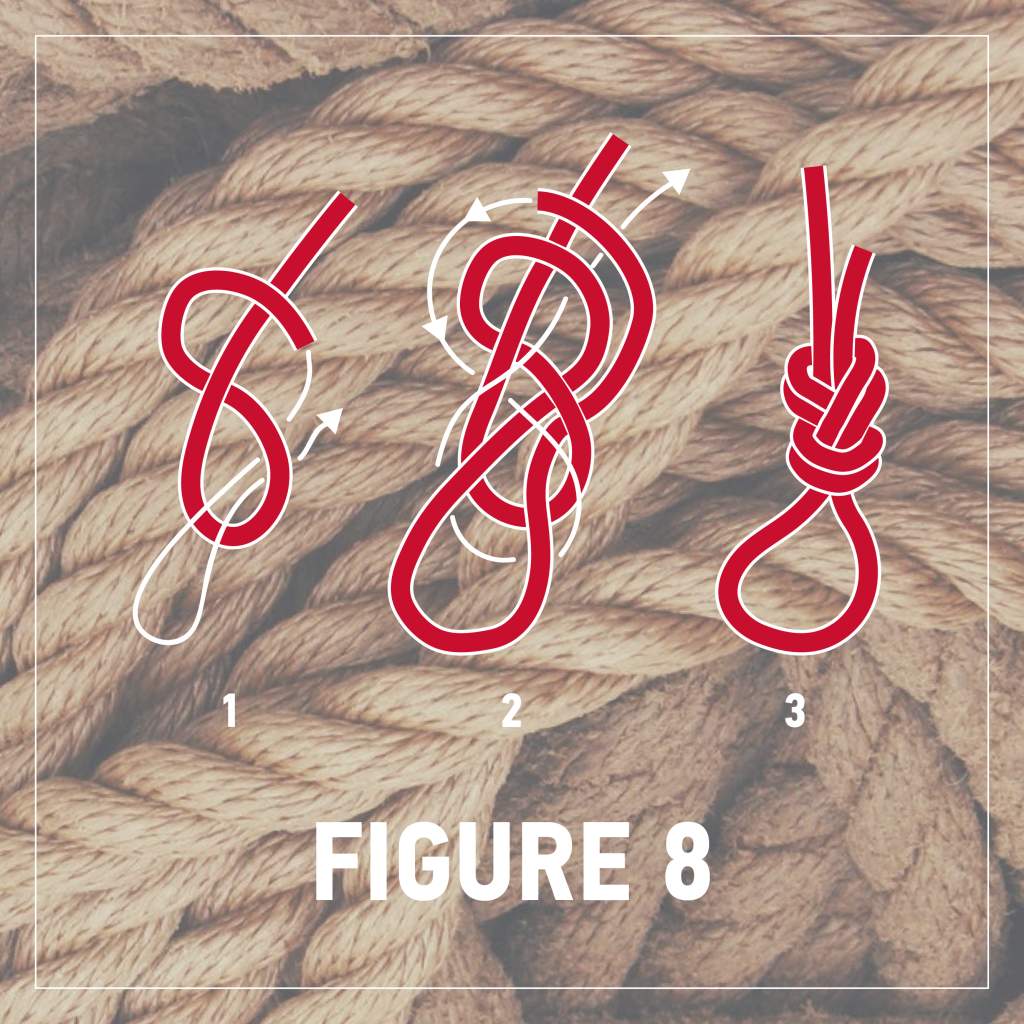
This is the most common rescue knot. It’s strong and easy to recognize, which is important so other rescuers can untie it when necessary.
To tie a figure 8 knot:
-
Create a Loop: As with many knots, this one starts with a loop. Hold the end of the rope in one hand and make a loop by crossing the working end over the standing part of the rope.
-
Form the Figure 8: Take the working end and pass it underneath the standing part. Then, bring the working end back over the standing part and through the loop you created in the first step. This will form the shape of the number 8.
-
Tighten the Knot: Pull the working end and the standing part to tighten the knot.
To finish this one, make sure that the knot is neat and the figure 8 shape is maintained.
6. Alpine Butterfly Knot
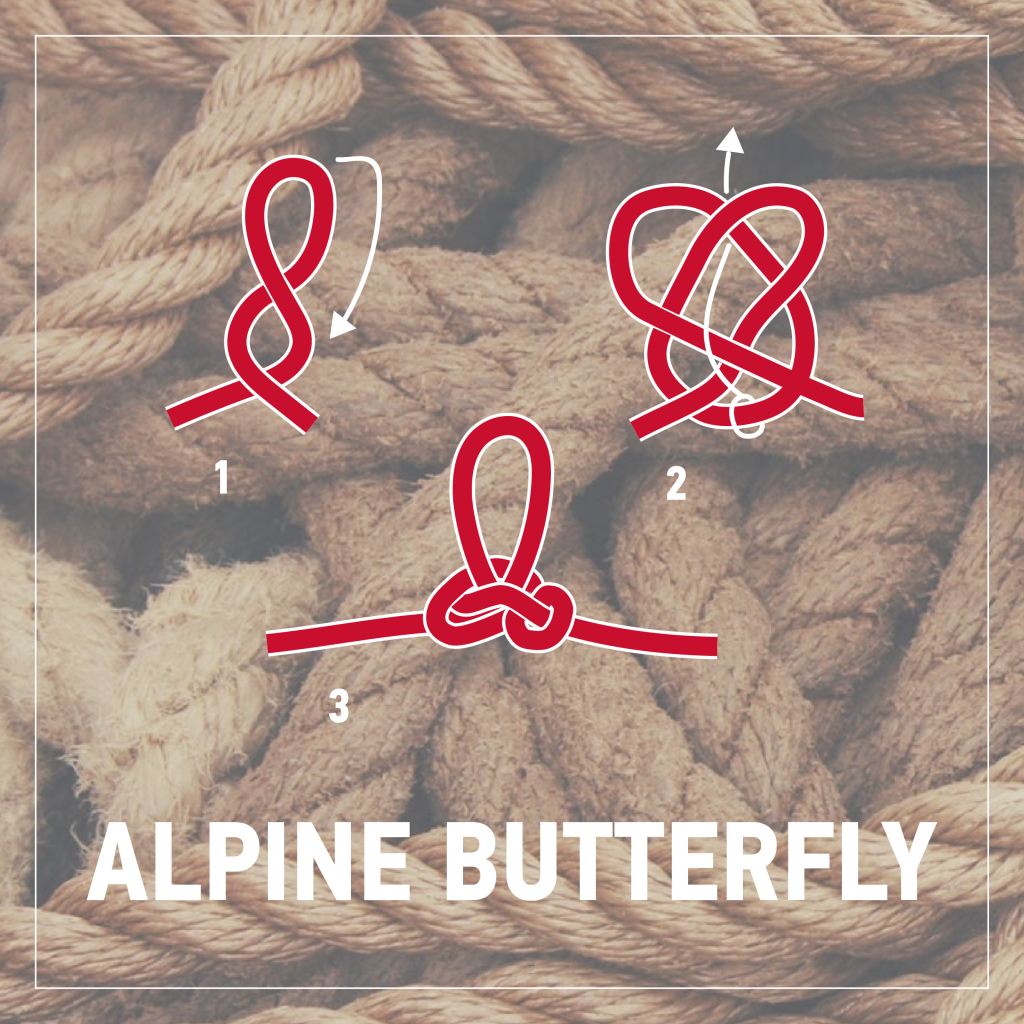
This knot creates a loop in the middle of a rope to secure a carabiner or tie out a weak spot in a line.
Practice the following steps to tie an alpine butterfly knot:
-
(Again) Form a Loop: Start by holding the rope in both hands and form a loop (or bight) in the rope.
-
Create Three Turns: Twist the loop to form two additional turns. You’ll have three loops stacked on top of each other.
-
Pass the Loop Through: Take the middle loop (the second loop) and pull it down over the other two loops.
-
Wrap the Loop: Pull the middle loop under the bottom loop and over the top loop. Then, tuck it back through the original loop.
-
Dress the Knot: Adjust the loops and pull the ends to tighten the knot.
Finish this one by making sure the knot is symmetrical and secure.
Knots in Rescue
Knowing your knots can help you in a rescue situation, whether you are being rescued or you are the rescuer. As a responsible boater, you must respond to boaters in distress if you see a boating accident or hear a call from boaters nearby.
It’s critical to know the right knots and how to tie and untie them quickly during a rescue. Most rescue knots should have an unsecured tail that is three or four inches long to prevent untying.
Remember also: Knots weaken rope by about 33%, so it’s essential not to use them if it isn’t necessary; it’s much better to tie one secure knot you can trust than a series of random knots with the hope they’ll stick.
Be a Safe Boater! Practice These Knots and Take a Boating Course
Simply knowing the right knots doesn’t make you a safer boater. There are many other factors and safety essentials to consider for operating safely on the water.
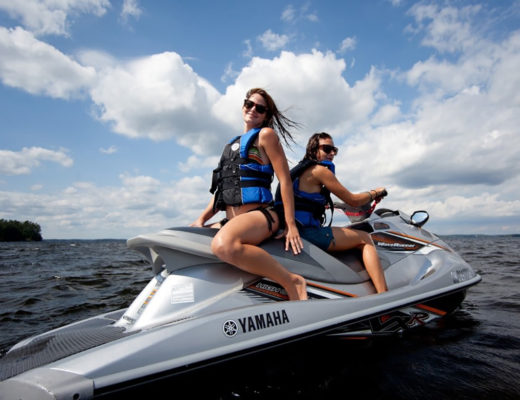
However, learning these knots can keep your boat from drifting away or help you tow in a disabled PWC (personal watercraft) to help someone on the water. Practice tying these knots until they become part of your muscle memory. We recommend trying them behind your back or underwater so you know you can tie them under any circumstances.
Additionally, taking a boater course can help you learn other safety essentials to protect yourself and others while on the water. BOATsmart! makes it easy to take the course, take the exam, and get your boating license. In Canada, choose one of our Canada-approved courses. Boaters in the U.S. can choose the course for their states and learn!
Originally published November 27, 2017. Content most recently reviewed and updated August 1, 2024.
